This article outlines the testing process in Flutter. It demonstrates how to write and run unit tests and widget tests in Flutter.
It highlights the importance of testing and provides tips and best practices to ensure tests are effective and provide meaningful results.
The overall message is that testing is a key part of the development process in Flutter and should be given proper attention to ensure the quality and stability of apps.
Type of tests
These are the type of tests used in flutter projects:
Unit test
- Tests a single function, method or class.
Widget test (Component test)
- Tests a single widget
Integration test
- Tests a complete app or a large part of an app
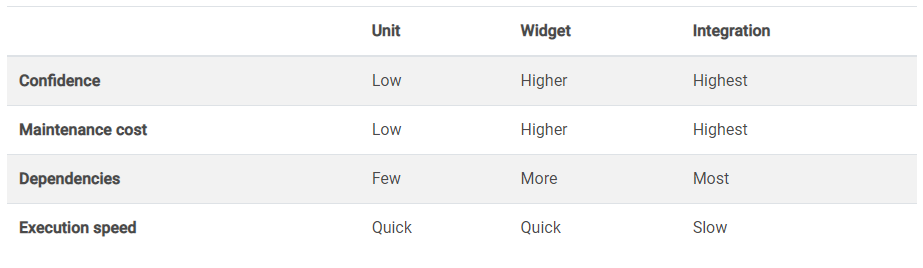
Well-tested apps have many unit & widget tests and an integration test for every important use case.
Unit and widget tests are tracked by CodeCoverage, a percentage measure of the degree to which the source code of a program is executed when a particular test suite run.
Main criteria of coverage:
Function coverage
- Has each function or subroutine in the program been called?
Statement coverage
- Has each statement in the program been executed?
Edge coverage
- Has every edge in the control-flow-graph been executed?
Branch coverage (edge subset)
- Has each branch of each control structure been executed? eg.: if / else
Condition coverage
- Has each boolean sub-expression evaluated both to true and false?
Code Coverage in general
Example function with coverage descriptions
int foo (int x, int y) {
  int z = 0;
  if ((x > 0) && (y > 0)) {
    z = x;
  }
  return z;
}
Function coverage:
- Satisfied if the function
foois executed at least once
Statement coverage:
- Satisfied if every line in this function is executed, including
z = x, this can be achieved by testing forfoo(1,1)
Branch coverage:
- Satisfied if every possibility of the inner branches is executed
(if evals to true or false), this can be achieved by testing forfoo(1,1)in which case every line is executed, and by testing forfoo(0,1)because in that case(x>0)is evaluated false and that prevents the execution ofz = x.
Condition coverage
- Satisfied if every combination of the conditions is executed, this can be achieved by testing for all 3 cases:
foo(1,0) foo(0,1) foo(1,1). - In the first case
x>0is evaluated true, while in the second is evaluated false - In the first case
y>0is evaluated false, in the second case its not evaluated because of lazy-evaluation, in the third case its evaluated true.
More info on code coverage.
Flutter coverage
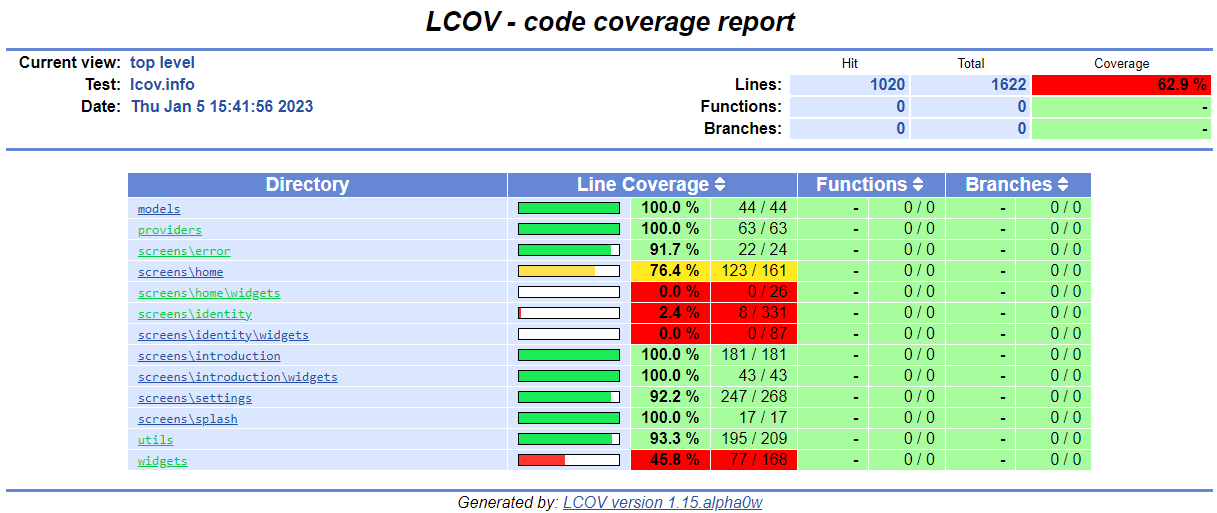
You can create a coverage report for Flutter (dart), by running the flutter test --coverage command in the project root. This will generate a coverage/lcov.info file in the root folder. This contains the line and function coverage for the project.
- Dart does NOT support function coverage by default and therefore its empty.
- It also does NOT support branch coverage, which is a soon-to-be-deprecated method of coverage (due to being way too specific and over the top for higher-level languages, it is still in use for C and C++ and other low-level projects)
Coverage reports can be generated from this lcov.info file via parsers, the most commonly used one is genhtml, a perl parser written in the 90s.
On linux and mac this can be downloaded via the system's package manager, on Windows the easiest way is to use chocolatey to download a ported version. Since I'm on windows, I will demonstrate creating a visual report on this system. genhtml 's location for me is in choco tools.
Which for me is here: C:\ProgramData\chocolatey\lib\lcov\tools\bin\genhtml Perl is scripting language, which also has to be installed via choco (or any other means, but I found this the easiest way).
After you have installed Perl, genhtml and generated the lcov.info, you can run the following command in the project root.
perl C:\ProgramData\chocolatey\lib\lcov\tools\bin\genhtml --branch-coverage -o coverage\html coverage\lcov.info
The command structure is as follows: perl <script location> --branch-coverage -o <output location> <input location>
The --branch-coverage option generates branch coverage, it is useless for dart projects, But I included it for completeness.
After running the command you will find the generated HTML in the coverage/html folder (or whatever your output folder is). By clicking the index.html, you will be greeted with a visual report like this one:
Unit tests in depth
Unit tests ensure that the application is working correctly even after new features and modified functionality. They verify application behaviour by testing the behaviours of its building blocks such as functions, methods and classes.
In flutter, every project includes a test folder by default in the root of the project. You can create a unit test by creating a .dart file in this folder. It is advised to always end with _test in their name, and my subjective opinion is that they should also be grouped by type and module, such a file structure would look like as such: /test/unit/auth/user_test.dart
Example unit test in Flutter:
Source
enum CatState { SLEEPING, AWAKE }

class Cat {
  CatState state = CatState.AWAKE

  void sleep() => state = CatState.SLEEPING;
  void wake() => state = CatState.AWAKE;
}
Test
// Import the test package and Cat class
import 'package:cat_app/cat.dart';
import 'package:test/test.dart';

void main() {
  test('Cat should be sleeping', () {
    final cat = Cat();

    cat.sleep();

    expect(cat.state, CatState.SLEEPING);
  });

  test('Cat should not change state after waking twice in a row', () {
    final cat = Cat();

	// It is also important to know the cat is awake by default. (on construction)
    cat.wake();
    cat.wake();

    expect(cat.state, CatState.AWAKE);
  });

  test('Cat should be awake by default', () {
    final cat = Cat();

    expect(cat.state, CatState.AWAKE);
  });
}
Similar tests can (and should) also be grouped, for example:
// Import the test package and Cat class
import 'package:cat_app/cat.dart';
import 'package:test/test.dart';

void main() {
    group('Cat tests', () {
      test('Cat should be sleeping', () {
        final cat = Cat();

        cat.sleep();

        expect(cat.state, CatState.SLEEPING);
      });

      test('Cat should not change state after waking twice in a row', () {
        final cat = Cat();

    	// It is also important to know the cat is awake by default. (on construction)
        cat.wake();
        cat.wake();

        expect(cat.state, CatState.AWAKE);
      });

      test('Cat should be awake by default', () {
        final cat = Cat();

        expect(cat.state, CatState.AWAKE);
      });
    })
}
Tests can be run with the command flutter test Individual tests can be run by providing the file name, in this case, it would be: flutter test test/unit/cat_test.dart
Sometimes you require the same instance of a class over and over in multiple tests. In these cases, you can either use setUp if you need a new instance every time or setUpAll if you need continuous testing. An example using the Cat class and setUpAll(). Since the cat is instantiated once, changes will persist to it through tests (unless overridden). (Obviously, these functions can be used for anything else that fits their narrative, class instantiation is just one of them)
void main() {
	group('Cat tests', () {
	  late final cat;

	  setUpAll(() async {
		  cat = Cat();
	  });

	  test('Cat should be awake by default', () {
		expect(cat.state, CatState.AWAKE); // Cat is awake by defualt
	  });

	  test('Cat should be sleeping', () {
	    cat.sleep();

	    expect(cat.state, CatState.SLEEPING); // sleep was called so the Cat sleeps
	  });

	  test('Cat should not change state after waking twice in a row', () {
		// cat is still sleeping from previous test
		expect(cat.state, CatState.SLEEPING);

		cat.wake();
		cat.wake();

		expect(cat.state, CatState.AWAKE); // cat is now awake
	  });
	})
}
These tests will all pass.
In the following case, we'll be using setUp which gets called before EVERY test. (we removed the final keyword)
void main() {
	group('Cat tests', () {
	  late Cat cat;

	  setUp(() async {
		  cat = Cat();
	  });

	  test('Cat should be awake by default', () {
		expect(cat.state, CatState.AWAKE); // Cat is awake by defualt
	  });

	  test('Cat should be sleeping', () {
	    cat.sleep();

	    expect(cat.state, CatState.SLEEPING); // sleep was called so the Cat sleeps
	  });

	  test('Cat should not change state after waking twice in a row', () {
		// cat is still sleeping from previous test
		expect(cat.state, CatState.SLEEPING);

		cat.wake();
		cat.wake();

		expect(cat.state, CatState.AWAKE); // cat is now awake
	  });
	})
}
The first 2 tests will pass, but the third one will fail because a new cat is instantiated before every test and the default state of the cat is AWAKE.
Both setUp and setUpAll functions are SCOPED, and only apply to their respective group, unless declared in the main function.
Mocking
In some cases, you will want to test functions and classes that depend on web servers or databases. In these cases, you want to mock the medium you use to fetch or retrieve that data. In the case of a webserver you would try to mock the http.Client, an example of this can be found in the official docs Mocking the http.Client
Mocking Local Auth (with mocktail)
You can mock any class with mocktail, by simply extending the Mock class and implementing the class you want to mock. In this example, we will be mocking the LocalAuthentication class. Creating the mock class is as simple as:
class MockLocalAuthentication extends Mock implements LocalAuthentication {}
Let's create a new unit test that declares a localAuth instance by instantiating the mock class.
void main() {
  late final LocalAuthentication localAuth;

  // Runs before the first test
  setUpAll(() async {
	TestWidgetsFlutterBinding.ensureInitialized(); // required for local auth
	localAuth = MockLocalAuthentication();
  });
}
In mocktail, we can detect when a function is called and react appropriately by using the when constant and a callback to the function. If the function has parameters they can be mocked as well using the any() method which produces mock data for the argument. When using named parameters, you have to provide the name of the parameter as well.
//...
	test('Authentication is successful', () async {
		when(() => localAuth.authenticate(
            localizedReason: any(named: 'localizedReason'),
            authMessages: any(named: 'authMessages'),
            options: any(named: 'options'),
          )).thenAnswer(
	        (_) async => true,
        );

		expect(await localAuth.authenticate(), true);
	});
//...
This test will fail though because the options named parameter requires a custom type called AuthenticationOptions, which is not supported by default by mocktail. AuthMessages can be an empty array, even though it would require custom types. We can create a fallback value for any type by calling registerFallbackValue(**Type**)
	setUpAll(() async {
		//...
		registerFallbackValue(const AuthenticationOptions());
	});
The fallback value is not reset by calling the reset() function. (which by default resets stub information like the when() function)
By providing a fallback value the test will successfully pass.
Widget tests in depth
Widget tests are done similarly to unit tests, except instead of the test dev_dependency, we use tools from the flutter_test package, this ships with the Flutter SDK, and should be included in every new flutter project (2.0+)
The code is from the official docs. Included for demonstrational purposes.
Source
class MyWidget extends StatelessWidget {
  const MyWidget({
    super.key,
    required this.title,
    required this.message,
  });

  final String title;
  final String message;

  @overrideWidget build(BuildContext context) {
    return MaterialApp(
      title: 'Flutter Demo',
      home: Scaffold(
        appBar: AppBar(
          title: Text(title),
        ),
        body: Center(
          child: Text(message),
        ),
      ),
    );
  }
}
Test File
void main() {
  testWidgets('MyWidget has a title and message', (WidgetTester tester) async {
    await tester.pumpWidget(const MyWidget(title: 'T', message: 'M'));

	// Create finders
	final titleFinder = find.text('T');
	final messageFinder = find.text('M');

	// Use the `findsOneWidget` matcher provided by flutter_test to verify that the
	// Text widgets appear exactly once in the widget tree.
	expect(titleFinder, findsOneWidget);
	expect(messageFinder, findsOneWidget);
  });
}
WidgetTester is provided by the flutter_test package.
The pumpWidget method builds a widget. (calls the build() function)
- In the test environment, rebuilds happen when called, instead of automatically. For example, if a button is called that calls
setState()it will rerender in a live application but will not in the test environment. You have to calltester.pump(Duration.zero) to advance by frame, or you can call it with a duration larger than zero to advance the clock by a certain amount. - You can also call pumpAndSettle, to repeatedly call until there are no frames scheduled, this is especially useful when testing navigation.
The find constant (Finder) is available in the global test context.
The expect constant (Assertion Control) is available in the global test context.
- So is every matcher. Matchers are the expected arbitrary values such as
findsOneWidget - More matches can be found in the official docs.
Running this test will result in a successful case, as we deliberately gave T & M values to the widget constructor.
Finding Widgets with different finders.
testWidgets('finds a Text widget', (tester) async {
  // Build an App with a Text widget that displays the letter 'H'.
  await tester.pumpWidget(const MaterialApp(
    home: Scaffold(
      body: Text('H'),
    ),
  ));

  // Find a widget that displays the letter 'H'.
  expect(find.text('H'), findsOneWidget);
  expect(find.byType(Text), findsOneWidget);
});
- The byType function has one parameter which is the class of the Widget, that you want to find.
Finding a Widget by Key
Sometimes there are multiple instances of a widget, for example, a List, in this case, you can look for it by key.
testWidgets('finds a widget using a Key', (tester) async {
  // Define the test key.const testKey = Key('K');

  // Build a MaterialApp with the testKey.await tester.pumpWidget(MaterialApp(key: testKey, home: Container()));

  // Find the MaterialApp widget using the testKey.
  expect(find.byKey(testKey), findsOneWidget);
});
Finding a Widget by instance
Sometimes you want to follow a certain widget, and after you performed your actions on it you want to find the exact instance. You can do this by keeping a reference for it in context.
testWidgets('finds a specific instance', (tester) async {
  const childWidget = Padding(padding: EdgeInsets.zero);

  // Provide the childWidget to the Container.await tester.pumpWidget(Container(child: childWidget));

  // Search for the childWidget in the tree and verify it exists.
  expect(find.byWidget(childWidget), findsOneWidget);
});
These are the most commonly used finders, but there are quite a lot more. You can find the list of all finders and extra info here.
Testing scrolling inside a widget
This is a less common but still quite frequent problem, it has a decent description on the official site so I will just link that here.
Testing tap, drag and inputs
Functions from the WidgetTester class, such as
- enterText (enters text into a widget found by a finder)
- tap (taps a widget found by a finder)
- drag (drags a widget found by a finder) handles such tests, they are self-explanatory and I could not explain it any better than the docs do. You can read more here.
Package tests
In some cases, we might test packages that use native components to function, such as camera functions or platform native requests (like android intents). Flutter packages communicate with their native counterpart using platform channels, specifically method channels to call, well methods. (You can read more about platform channels here)
In test cases such channels are not instantiated as tests are platform-independent (in most cases), therefore we have to simulate these method calls by declaring our mock channels.
To mock a method channel, you first need the channel's name, which is unique across packages. To obtain this URL, usually you have to scrub through the files of the package. In most cases the file holding this information will be explicitly called "method_channel_config.dart", but it can be also hard to find sometimes.
In the following example, I'm going to mock the permission_handler package's method channel to simulate a user granting or denying permission to an application. This package's method channel is flutter.baseflow.com/permissions/methods.
In my particular case, I want to override the package's calls for permission requests. The method's name is "requestPermissions", this I also found out from the source code of the package.
We start by declaring a mock handler with the name I mentioned,
const MethodChannel(MethodChannels.PERMISSION_HANDLER)
      .setMockMethodCallHandler((MethodCall methodCall) async {
    if (methodCall.method == 'requestPermissions') {
      if ((methodCall.arguments as List).contains(Permission.camera.value)) {
        return {
          Permission.camera.value: PermissionStatus.granted.index,
        };
      }

      return {};
    }

    return null;
  });
We know that this "requestPermissions" method has to return a Map<int, int> type, which is basically a Map of the Permission id and the PermissionStatus index. In this instance I return, the granted status's index, to which the application reacts as it was granted.
You can declare a new mock call handler anytime and it will override the previous one (if you have multiple with the same name).
We can now proceed to test that the package correctly calls our mocked handler.
//...
test('Permission handler calls mock handler', () async {
	final status =  await Permission.camera.request();
	expect(status, PermissionStatus.granted);
});
//...
This method of mocking works even when the widget calls it, not just by us directly calling the function, therefor is a necessity for widget tests.
Testing Widget properties.
In some cases we change UI after some logic, we are going to demonstrate this by declaring a container with no background color and a button which when clicked changes the background color of the container to blue and we will verify that.
Widget under test (WUT)
class TestRandomWidget extends StatefulWidget {
  const TestRandomWidget({super.key});

  @override
  State<TestRandomWidget> createState() => _TestRandomWidgetState();
}

class _TestRandomWidgetState extends State<TestRandomWidget> {
  bool buttonClicked = false;

  @override
  Widget build(BuildContext context) {
    return Column(
		  children: [
			  const TestSquare(active: buttonClicked),
			  OutlinedButton(
				onPressed: () {
					setState(() {
						buttonClicked = true;
					});
				},
				child: Text('Let it be blue'),
			  ),
		  ]
	  );
  }
}

class TestSquare extends StatelessWidget {
  const TestSquare({
    Key? key,
    required this.active,
  }) : super(key: key);

  final bool active;

  @override
  Widget build(BuildContext context) {
	  return Container(
		  width: 20,
		  height: 20,
		  color: active ? Colors.blue : Colors.red,
	  )
  }
}
Very simple widget for the purpose of this demonstration now let's render it in a test.
testWidgets((WidgetTester tester) async {
	await tester.pumpWidget(const MaterialApp(
	    home: Scaffold(
	      body: const TestRandomWidget(),
	    ),
	));

	// lets tap the button by type, we know there is only one
	await tester.tap(find.byType(OutlinedButton));

	await tester.pumpAndSettle(); // wait for the state change and last frame in schedule

	// find a TestSquare class by type which we know only one exists, typeMatch it with isA<TestSquare>()
	expect(
		find.byType(TestSquare),
		isA<TestSquare>().having( // A TestSquare class that
			p0 => p0.active, // has the active property
			'active',  // this is just a diagnostical description, should always be the name of the property.
			true, // with the value 'true'
		),
	);
})
This way we know that TestSquare was rendered with the active property true after the button was clicked.
Integration tests
Integration tests require a complete application or a complex logic flow.
- Usually demonstrates every intended use of the application or feature by navigating through the application from start to finish or until the feature is considered to have fulfilled its purpose.
- Very project/feature specific, and is based on the combination of unit and widget tests working together to complete the flow.
Wrap-up
Now that you have an idea of how to write and run unit tests and widget tests in Flutter, you should be more
comfortable in the stability of your application(s).
Testing is only a daring task if you overcomplicate it with tech jargon, in reality, its more about ensuring
whatever you wrote will work in every or at least most scenarios.
Sources:
- https://en.wikipedia.org/wiki/Code_coverage
- https://en.wikipedia.org/wiki/Statement_(computer_science)
- https://docs.flutter.dev/cookbook/testing
- https://pub.dev/packages/mocktail
Other interesting documents:
- https://docs.flutter.dev/testing/debugging
- https://docs.flutter.dev/perf/best-practices
- https://docs.flutter.dev/resources/platform-adaptations