
Angular with its default settings is blazingly fast enough for most projects. As the applications’ concurrently rendered component count grows, however, the page starts to struggle to keep up with the desired response rate to user interactions. This is when the user experiences application lagging. How can we improve the code a little, so we can avoid such deterioration of the performance on a large scale?
My name is Márk Baranyai, I’m a senior Angular developer at Adroit Group and in this article, we are going to discuss how Angular changes the UI with its Default change detection strategy, then we are going to see it in action with the help of a simple live example application. Next, we are going to switch to OnPush change detection strategy and talk about the differences and benefits, how it works, and what we need to do differently compared to before.
Change detection cycle
Angular updates the DOM if something changes in the model and the new data needs to be reflected on the UI.
It accomplishes this task during a change detection cycle.
Change detection cycles are the result of signals coming from the library Zone.js. These signals are triggered by
- DOM events
- native browser API calls (fetch request, setTimeout, etc.)
- Other occasions are listed in Zone.js’s STANDARD_APIS.md file.
For each signal, a change detection cycle starts. During this cycle, Angular traverses through the component tree starting with the root component in the following recursive way:
- It checks the component’s template for changes
- It goes onto its immediate children components and checks their template
- Then if any of the checked children components have their own children components, the recursion starts again with them in order.
You can see an example component hierarchy, with the component’s check order next to their names in parenthesis in the picture below.
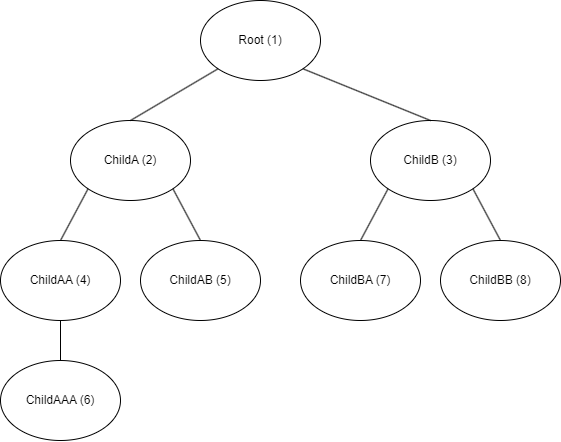
Visitation order during a change detection cycle
Default Change Detection Strategy
With the default change detection strategy, Angular always checks every component during every change detection cycle.
In this way, it doesn’t matter where and how a component’s model changes, Angular will find it, and it will render the new UI.
This is a beginner-friendly mode because the developers have complete freedom about how they change a component’s inner state, it will just work.
This convenience can become a downside, however. Always checking everything means that as the simultaneously rendered components count grows, (more precisely the number and complexity of the template expressions) the more time it takes for these cycles to finish.
Live example application
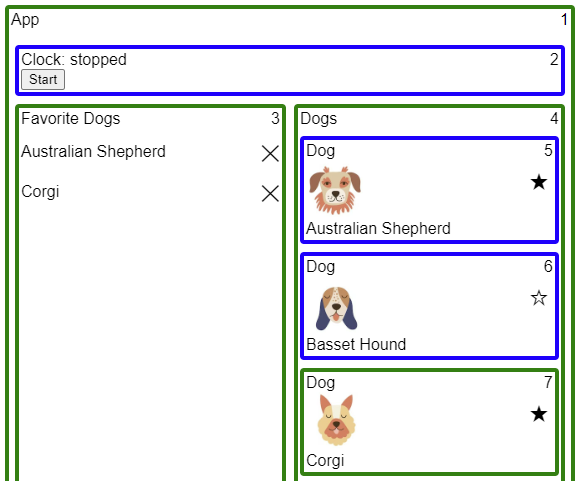
I’ve created a simple application to demonstrate this behaviour. You can see it in action on StackBlitz, and in this screenshot.
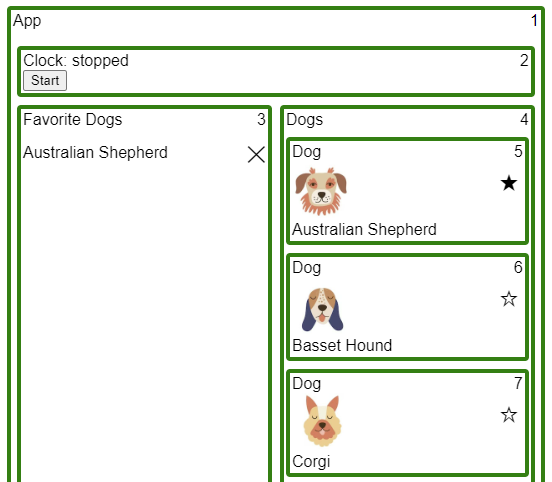
Application screenshot with Default change detection Strategy
The application has 2 main functionalities:
There is a clock in the header, which can be started and stopped. If started, it shows the current date and time in real-time.
Below there are 2 columns. Both columns are used to set or unset dogs as favourites.
- The left column consists of a list of favourite dogs, and you can clear dogs by clicking on the X button next to the dogs’ names.
- The right column shows all the dogs and you can set or unset them as favorites by clicking on the star icon. The full star means the dog is marked as a favourite, while the empty star means it is not.
I used some native TS rendering sorcery outside of Angular to mark each component with a border and also display in what order the component’s being checked during a change detection cycle.
There are 3 types of border colouring, based on what happened with the component during the last change detection cycle:
- Green means that the component was visited and checked for changes
- Blue means that the component was visited but it wasn’t checked for changes
- Red means that the component wasn’t visited at all and therefore it wasn’t checked for changes either
Aside from the borders, every component has its name in the upper left corner and as I’ve mentioned before, they have a number shown in their upper right corner. This number is the order in which they were visited during the last change detection cycle.
The application’s components are all set to Default Change Detection Strategy, therefore whatever the user does in the app, all the borders are green indicating that Angular checked everything on every change detection cycle.
OnPush change detection strategy
We can improve the performance of a change detection cycle by using the OnPush change detection strategy on components instead of the Default one. Change detection strategy can be set on each component’s decorator individually like this:
import { ChangeDetectionStrategy, Component } from '@angular/core';

@Component({
  selector: 'app-random-component',
  templateUrl: './random-component.component.html',
  styleUrls: ['./random-component.component.scss'],
  changeDetection: ChangeDetectionStrategy.OnPush,
})
export class RandomComponent {}
With the use of OnPush change detection strategy, Angular will skip the component and its component subtree from checking during change detection cycles if certain conditions are not met.
During a change detection cycle whenever Angular encounters a component it checks if at least one of the following criteria are met in order to decide whether or not it will check the component’s template for changes:
- At least one of the component’s @Input() properties got a new reference (or value for primitive types) from above via input binding
- The component has been marked for check previously
For the first criterion, Angular compares the component’s old and new inputs with shallow comparison (so be careful with mutating objects passed down as inputs, because they won’t count as change due to unchanged object reference)
For the second criterion, first, we need to clarify what it means to mark a component for a check.
Mark a component for check
We can mark a component for check with the injectable ChangeDetectorRef service in the component’s TS file:
this.changeDetectorRef.markForCheck();
This call synchronously marks the component, and its parent chain all the way up to the root component to be checked during the next change detection cycle. A markForCheck function call does not trigger a change detection cycle, it just marks components for the next cycle, whenever it may be.
It is possible to trigger a change detection cycle synchronously however with the following code:
this.changeDetectorRef.detectChanges();
It’s important to distinguish between these function calls, because markForCheck() marks the component and its parent chain for check, but does not trigger a change detection cycle, while detectChanges() triggers a change detection cycle, but does not mark the component and its parent chain for check.
In our example application, if a Dog component calls markForCheck on its ChangeDetectorRef, it will be marked together with the Dogs, and App components, as you can see in the image below.
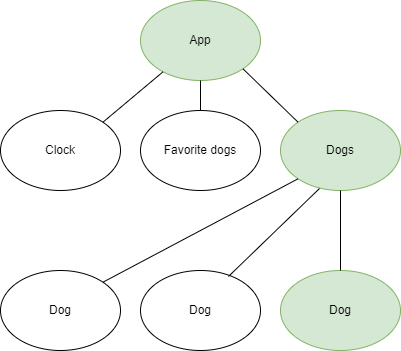
Marked components after calling markForCheck() in Dog component
The reason for this chain marking is if Angular needs to change something in the Dog component’s DOM, it needs to arrive there first during a change detection cycle. In order to arrive at the Dog component, Angular has to go through the App and Dogs components so they have to be marked also.
Every markForCheck is only relevant for the very next change detection cycle. After that, the markings are reset.
Implicit mark for checks
If we think about it, there are many occasions when a component’s inputs don’t change, but one of its descendants needs to have its template updated in reflection of some data changes.
For example, imagine a simple counter component that displays a number, and has an incrementer button, which when pressed, increases the displayed number in the template. When this button is clicked, we increment a number in the component’s model, which is bound to the template. So should we call this.changeDetectorRef.markForCheck() in the button’s click handler function besides incrementing the number property? The answer is no.
Luckily, we do not have to always do the marking manually, because there are some built-in tools, which if we use, the tool itself will call markForCheck for us in the background.
Event and Output binding in template
One of these tools is event binding in templates. Whenever you listen to any kind of event in a template with the event binding syntax, markForCheck will be called whenever an event is caught with that handler.
<button (click)=”someEventHandler($event)”>
The use of async pipe in the template
Another great method is using async pipes in the template. The async pipe subscribes to the source that is attached, and whenever that source emits a new value, the pipe calls markForCheck for us besides saving the new value for the template. Some other benefits of using an async pipe come when the source is observable.
If we wouldn’t use async pipes in the template, but instead we handle the observable in the TS part of the component instead, we would have to do multiple things manually:
- We would need to subscribe to that observable.
- On value emissions we would need to call this.changeDetectorRef.markForCheck() if we want the template to update during the next change detection cycle.
- We would need to unsubscribe from that source at some point to avoid potential memory leaks.
With an async pipe, we don’t have to do any of that manually.
There is an example of the use of an async pipe in the Dogs component in our example application.
<app-dog
  *ngFor="let dog of dogs$ | async; trackBy: trackByFn"
  [name]="dog.name"
  [url]="dog.url"
  [favorite]="dog.favorite"
  (favoriteToggle)="onDogFavoriteToggle(dog.id)"
></app-dog>
Using HostListener decorators
When you use event handlers with the @HostListener decorators, you don’t need to call markForCheck() in those handlers either.
OnPush change detection in the live example
We can set all of the components’ change detection strategy in the change-detection-strategy.ts file, by changing the value of the activeChangeDetectionStrategy variable to ChangeDetectionStrategy.OnPush
Case studies
Let’s have a look at some case studies from our live application with the OnPush change detection strategy set on every component.
Starting the clock
Start the clock with the start button so it will update every second. Besides the working clock, you’ll see that there are some components with green, blue and red borders. Here is a screenshot of the application while the clock is switched on.
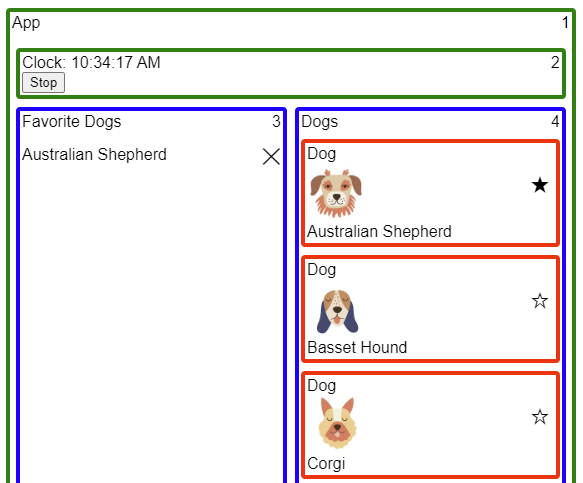
Screenshot of the example application while the clock is working
Let’s go through the events that are happening every time the clock value changes.
- The timer fires in the Clock component’s TS code.
- We set the new timestamp to the “time” public property. Immediately after that, we call this.changeDetectorRef.markForCheck() to mark the Clock component for check alongside its parent, the App component for the next change detection cycle.
- The timer’s subscriber functions finish running.
- RxJs’s timer uses the setTimeout browser feature in the background, therefore after the callbacks are finished a change detection cycle starts due to zone.js.
- In summary, Only the Clock and App components are marked for check just before the change detection cycle starts.
Now let’s see what happens with the components during the change detection cycle in visitation order:
- App component: It doesn’t have any input properties, therefore none of its inputs change. It is marked for check by the markForCheck function call in the Clock’s TS file as we discussed before. Because one of the 2 conditions is always met, the App component is being checked for changes, hence it has a green border.
- Clock component: It doesn’t have any input properties, so they don’t change, but as we saw before, the Clock component is always marked for check by the markForCheck function call in the timer’s subscriber callback. Because one of the conditions is met, it is checked for changes, so it is marked with a green border.
- Favorite Dogs component: The component is a direct child of the App component, and because the App component is constantly checked for changes, the change detection cycle arrives here all the time and considers checking the component’s template. However, due to the fact that none of its inputs have changed, and nothing has been marked for check, Angular decides not to check the component’s template. That’s why it is marked with a blue border (visited, but not checked).
- Dogs component: Exactly the same as Favorite Dogs. Angular visits it but decides not to check its template for changes.
- Dog component: These components are marked with a red border, because Angular does not even arrive at them, as a result of the change detection cycle stopping at their parent’s, the Dogs component’s level.
Initially, when you press the start button and the Clock’s timer isn’t fired yet, the application still looks the same as it will be during the clock ticks. In this initial case, the markForCheck is not fired by the timer’s subscriber function, but the start button’s click event binding instead.
<button *ngIf="!time" type="button" (click)="startClock()">Start</button>
Marking a dog as favorite in the right column
Stop the clock for now, so it does not mess with our border coloring every second. Now click on the star icon next to one of the dogs. I’ll choose the Corgi for this example. The application should look something like this:
Screenshot of the example application after setting Corgi as favorite
Let’s go through the events that happened due to the mouse click.
- The click event binding fired in Corgi’s Dog component’s template. (click)=”favoriteToggle.emit()”
- Because we used the template event listener syntax, Angular marked the Corgi Dog’s component and all of its parent chains for the check, so the Corgi’s Dog, Dogs and App components.
- The click handler emitted the Corgi Dog component’s “favoriteToggle” output event emitter.
- The dogs component listened to this “favoriteToggle” event emitter via the template output listener, therefore Angular marked the Dogs component and its parent chain for the check, so the Dogs and App components. These components were already marked for check so this additional mark didn’t do anything.
- The dogs component’s “favoriteToggle” output listener function notified the DogsService about the new favorite dog.
- The DogsService calculated and emitted its new state via its state$ subject.
- The FavoriteDogs component was listening to this state$ subject emission in its template with the help of an async pipe.
- The Async pipe called markForCheck due to the new observable value emission, which marked the FavoriteDogs and App components for the check. The App component was already marked for the check, so the additional mark didn’t do anything.
- The click event’s handler finished running and due to the use of the underlying addEventListener browser feature, a change detection cycle started in response of a signal from zone.js.
- In summary, the click on Corgi’s star button caused the Corgi’s Dog, the Dogs, the Favorite Dogs and the App components’ mark for check right before the change detection cycle started.
Now let’s go through all the components one more time to see what happened to them during the change detection cycle.
- App component: It doesn’t have inputs so they didn’t change. The component was marked for check, therefore it was visited and checked. A green border is awarded.
- Clock component: Clock is a direct child of the App component, and because the App component was checked, the change detection cycle arrived at the Clock component, and considered it for check. Due to the fact that none of its inputs has changed, and it hasn’t been marked for check, the cycle left it without checking the template. That’s why it was marked with a blue border.
- Favorite Dogs component: It doesn’t have any inputs, so they didn’t change. It was marked for check as we saw earlier. The component was checked for change so it got marked with a green border.
- Dogs component: It doesn’t have any inputs, so they didn’t change. The component was marked for check so its template got checked and it received a green border.
- Dog components: All of the dog components were visited by the change detection cycle due to their parent’s template’s check. But only one dog, the Corgi, got a green border. This is because only the Corgi Dog component was marked for check and its “favorite” input also changed.
DoCheck component lifecycle hook
The DoCheck component lifecycle hook fires right when the change detection cycle arrives at the component, and it considers checking the template. If the component hasn’t been marked for check before, this lifecycle hook can be used as a last resort to mark the component for check.
This is the lifecycle hook that I used to detect whether or not a component has been visited by the change detection cycle.
Performance gains in this example
I opened the live example in another tab and used the Angular developer tools Chrome extension to profile how long it takes for Angular to finish change detection cycles while only the clock is ticking. With the default change detection strategy, the average time spent was 1.6 ms per change detection cycle.
Then I repeated the same profiling but this time using the OnPush change detection strategy. On average the change detection cycles took only 0.6 ms to finish due to the skipped components.
Though this is a small application with very few templates, it is pretty obvious that you can reduce the change detection cycle’s working time by a lot. On larger and more complex UI-s, this can easily be the difference between smooth and laggy user experiences.
My experience and opinion about OnPush
Initially, I made the most typical OnPush mistakes over and over, mostly forgetting to implicitly or explicitly mark a component for check and I had to debug why the UI didn’t update after an event.
Using OnPush requires a certain type of architecture for your application where you need to be able to react to data changes in your component because you need to mark the component when new data arrives either manually or with async pipes. Also, it is very important to change your application’s state in an immutable way because Angular will only do shallow comparisons on old and new inputs of your components.
In my opinion, the use of OnPush enforces a better application architecture overall, which makes the code base easier to understand, maintain and scale.
If you struggle through the initial overhead of learning and understanding how the change detection works in Angular, and getting used to how you have to deliver new data to the components with OnPush, then from that point onward, you will be able to develop much faster applications with minimal or no additional development time.
Wrap up
We have discussed how and when Angular checks the component tree for changes and how we can reduce the workload of Angular with the use of OnPush change detection strategy.
Thank you and congratulations for reaching the end of this article! I hope that I could help you understand some of the inner workings of Angular a little better and that it will benefit you in some ways.
Until next time, cheers! ✌